|
|
Course 1 Helpful Hints:
ü Laminate
your Practice Sheets on pages 49-52 (old pgs. 45-48).
ü Check
the How to Bake a Great Cake & Troubleshooting Guide for Bakers on page 47 (old pg. 43).
ü If using a stand mixer,
use a low speed (2 or 4) for mixing your icings and cake batter. Only use the flat beater attachment,
not the whisk or dough hook. It is OK to double the icing recipe in a stand mixer.
ü One box of cake mix
yields approximately 5-1/2 to 6 cups of batter. Check the paper insert that came with your pan to see how much batter
is needed and always measure the batter.
ü Save yourself
some time and use the 8x3' Round pan! This convenient pan eliminates the need to bake two layers
separately. Baking time is approximately 55 minutes at 350 degrees (individual oven times may vary).
ü Always make sure a
cake is completely cooled before icing. It's a good idea to let your cake rest in an airtight container for a
day or even overnight before you ice it.
ü The diameter of your
cake board needs to be at least 2 inches larger than the diameter of your cake (for example, an
8" cake needs a 10" cake board).
ü Use the grease-resistant
Show N' Serve cake boards to put your cake on, or tape together 2-3 plain white cake circles and cover with Fanci-Foil. (Plain white cake circles are not grease resistant and need to be covered
for this class.) Never use aluminum foil to cover cake circles.
ü If we are out
of the 10" Show 'n Serve Boards (or cake circles), you may substitute with the 12" versions instead.
ü Don't forget to put
some icing on your cake board before putting the cake on it to help the cake stick to the board.
ü Use the Wilton
Cake Icer Tip (with a 16" or 18" featherweight bag) to frost your cake faster and without crumbs!
ü Make darker colors
ahead of time, let sit overnight, then add more color if needed. To save time, use Wilton ready-to-use icing tubes,
available in multiple colors.
ü The wax paper
squares for your flower nail should only be as big as the top of the nail.....1-1/2" x 1-1/2". You don't want excess
hanging over the sides, it'll get in your way. Or save time and pick up our new pre-cut flower making squares!
ü For a quicker
way to make wax paper squares, use a Personal Paper Trimmer to make several 1-1/2" strips, then pile the strips on top of
each other and use scissors or the trimmer to cut into squares.
ü When washing
your flower nail, be sure to dry it thoroughly to prevent rusting.
ü It is recommended that tips be washed with warm soapy water. Never use
vinegar, it will ruin the finish on the tips. |
For EVERY CLASS, be sure to bring these items:
-
Lesson Plan
(book) and contents of Course 1 kit.
-
Plastic bags
to bring home your used decorating supplies.
-
Apron
-
Towel or plastic
tablecloth to cover your workspace
-
Toothpicks,
scissors, tape, pen or pencil
-
Measuring spoons
& spatula(s)
-
Extra powdered
sugar in a small container
-
Parchment or
waxed paper
-
Turntable and cake carrier to carry your cake or cupcakes.
|
 |
|
|
If you have a older version of the Course 1 book (Vince Naccarato on inside cover), then
you'll need to refer to the "old" page #'s listed below.
Getting Ready for Course 1, Lesson
2
- follow
directions on page 20 (old pg. 16)
Additional notes:
-
Bake, cool, level, fill, ice
your cake and smooth the icing at home. Your cake should be two layers, as shown in class.
-
We will be doing Option 2 - rainbow cake. See the picture on the bottom of
page 27 (old pg. 23).
-
You need to make 2 batches of class buttercream icing
as follows:
As listed under "Class Buttercream Icing":
- 1-1/2 cups medium
- 1 cup stiff
- 1/2 cup thin with 1/4 tsp. piping gel added
AND
As listed under "Option 2 Rainbow Cake":
- 1/4 cup medium red
- 1/4 cup medium yellow
- 1/4 cup medium green
- 1/4 cup medium violet (purple)
- 1/4 cup medium blue is optional.
It is for writing on the cake (optional).
- Use the rest of the icing to make
thin consistency in light blue
to ice your cake.
You will be bringing to class 3 containers of white icing
(medium, stiff, thin) for practice and 4-5 small containers of the colored icing for your rainbow cake. If you need
help please contact me.
-
Bring in your icings in airtight containers. I'll check your consistencies before you fill
your bags.
-
Bring in extra confectioner's sugar and tape.
-
You need to bring your container of Piping Gel (see page 4/old pg. 2) and
a Decorator Brush (see page 3/old pg. 1) to class for our second lesson.
-
Consider picking up extra tip 16's (3) so you have one for each color for your Rainbow
Cake - this is a big time saver. If we are out of tip 16, you can substitute with tip 14 or tip 18.
-
If using parchment bags, please fold them at home and bring them to class
ready to use.
Getting Ready for Course 1, Lesson
3
-
follow directions on page 28 (old pg. 24)
Additional notes:
-
Bake,
cool, level, fill, ice your cake (or cupcakes) and smooth the icing at home. Your cake should be two layers,
as shown in the first lesson of class.
-
The design for the practice cake (or cupcakes) in this lesson is up to you! You
can make the clown cake on page 34 (old pg. 30) or the drop flowers cake on page 35 (old pg. 31) or decorate cupcakes with
clowns, drop flowers, etc.
-
Prepare and
fill your decorating bags at home as follows:
- Thin, tip 3
- Medium, tip 21
- Medium, tip 2D
- Stiff, tip 12 [roses]
- Stiff, tip 104
[roses]
Don't fill your bags more than halfway full
- bring in any extra icing in covered containers.
Getting Ready for Course 1, Lesson
4
- follow
directions on page 36 (old pg. 32)
Additional notes:
-
Bake, cool, level, fill,
ice your cake and smooth the icing at home. Your cake should be two layers, as shown in the first lesson of class.
Please do not start decorating your cake at home.
-
You may bring in an 8" iced cake instead of a
10" cake.
-
The design for the final cake is on page 42 (old pg. 38). Writing
on the cake is optional.
-
Prepare and fill your decorating bags at home
as follows:
-
Thin w/piping gel, tip 3 (used for flower calyx, leaves/vines)
- Stiff,
tip 12 (for rose bases)
-
Stiff, tip 104 (for rose
petals & sweet peas)
-
Medium, tip 21 (for larger bottom shell border; you'll switch to tip 16 for smaller top shell border)
Don't fill your bags more than halfway full - bring in any extra icing in covered containers.
Optional: Bring in white cake sparkles, and I'll show you how to make your roses even more fantastic!
If you have any questions about homework before the
next class, please contact me.
Practicing at home will
reinforce what you learn in class and make you a better decorator!
|
|
|
|
|

|
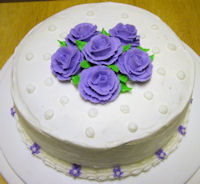
| This will be the cake we do in our 2nd class! |
|
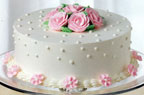
| You can make a cake like this in the final class! |
|
|
|
|
|